
Tire and wheel technical guide
Tire replacement, rotation, balancing, and TPMS are connected—but they solve different problems
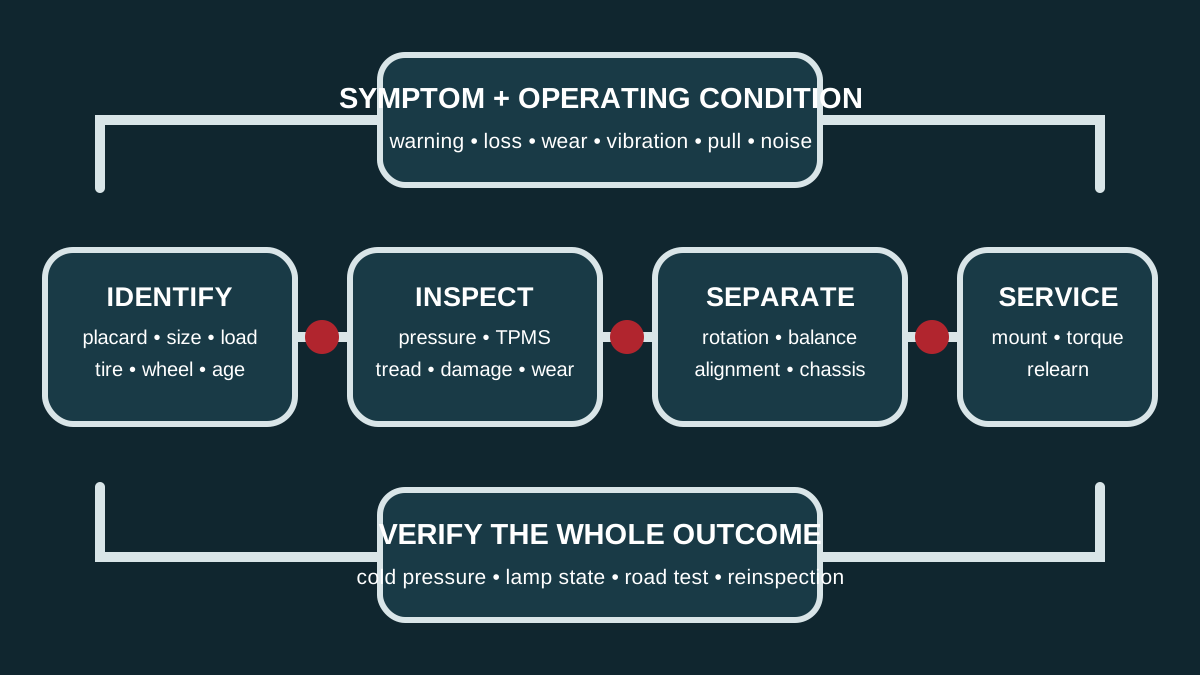
A pressure warning, uneven tread, vibration, pull, noisy tire, or damaged sensor does not justify the same service. Safe decisions begin with the exact tire and wheel application, cold inflation pressure, load, damage and wear evidence, vehicle layout, TPMS design, and the operating condition that produces the complaint. This guide separates those decisions and defines what should be verified after the work.
Stop for rapid pressure loss, structural damage, or unsafe handling
Reduce speed smoothly and stop in a safe location if a tire is rapidly deflating, a bulge or exposed cord is visible, tread is separating, the vehicle develops severe vibration or pulling, a wheel is damaged, or steering becomes unstable. Do not keep driving merely because the TPMS lamp has not illuminated. A direct sensor can miss an unmonitored spare or fail, and an indirect system may need vehicle movement before it recognizes a difference.
After a sudden pressure loss, do not assume reinflation makes the tire safe. Driving underinflated can damage the inner liner, sidewall, bead, wheel, and sensor without leaving complete evidence on the exterior. A tire involved in an impact, overload, overheating event, or run-flat operation needs assessment under the tire maker and vehicle procedures. Temporary mobility kits, compact spares, and run-flat allowances have specific speed, distance, repair, and replacement limits.
Begin with the vehicle placard, exact fitment, and current configuration
NHTSA directs drivers to the Tire and Loading Information label or owner’s manual for the recommended size and cold pressure. The pressure molded on the tire sidewall is not the vehicle’s routine inflation target; it identifies a tire limit under defined conditions. Record the vehicle identification and option package, front and rear sizes, load and speed service descriptions, wheel dimensions and offset, approved alternatives, spare type, and whether the vehicle uses a staggered or directional arrangement.
Inspect every installed tire’s brand, model, size, service description, DOT Tire Identification Number, direction or inside/outside marking, run-flat or special construction, and visible repairs. Confirm wheel compatibility and the tire maker’s rim-width range. Modified wheels, mixed diameters, spacers, incorrect rolling circumference, or incompatible load capacity can affect clearance, braking, steering, all-wheel-drive operation, speed calculation, driver assistance, and direct or indirect TPMS behavior.
Measure pressure cold and investigate why it changed
Check all road tires and the spare with an accurate gauge before driving or after the vehicle has been parked long enough to meet the cold definition. Front and rear specifications may differ. Ambient temperature changes pressure, but a recurring loss at one position still deserves leak inspection. Record the measured value before adjustment, then inspect the tread, bead, valve, cap, wheel and any repair area using an appropriate leak method.
Underinflation increases deflection and heat; overinflation changes compliance and contact behavior. Neither should be corrected by eyeballing the tire. A warm reading normally rises, so do not bleed a warm tire down to the cold placard value and leave it underinflated later. If temporary inflation was needed to move the vehicle safely, recheck when cold. Nitrogen does not eliminate routine pressure checks, punctures, permeation, temperature effects, or the need to use the vehicle specification.
Read the TPMS lamp pattern before replacing a sensor
NHTSA explains that a steady low-pressure warning means at least one monitored tire is significantly underinflated, while a lamp that flashes for roughly a minute and then remains on can indicate a system malfunction. First measure every tire, correct pressure safely, inspect for loss, and consult the owner information. Do not erase a real pressure concern by resetting the system to an incorrect baseline.
Direct TPMS uses pressure sensors associated with the wheels; indirect TPMS infers change from wheel-speed and other vehicle data. A direct-system fault can involve a sensor battery or pressure element, valve or seal, damaged housing, wrong frequency or protocol, missing identification, receiver or antenna, wiring, module, programming, or relearn. An indirect-system fault can involve tire mismatch, pressure, wheel-speed data, calibration, or a related chassis fault. A code naming one wheel or sensor is a test direction, not automatic proof of the part.
Tread depth is one replacement criterion—not the entire inspection
NHTSA identifies 2/32 inch as the point at which a tire is worn out, but replacement can be necessary earlier for damage, irregular wear, wet or winter performance needs, or manufacturer requirements. Measure several grooves across the tread and around the circumference. Tread-wear bars are useful limits, yet they do not reveal every shoulder, sidewall, bead, inner-liner, impact, puncture, separation, or previous-repair concern.
Inspect both sidewalls, the full tread, bead area where visible, and the inner face—not only the outer shoulder. Look for cuts, cracks, bulges, cords, chunks, embedded objects, heat discoloration, flat spots, cupping, feathering, center or shoulder wear, and foreign material. Wear pattern can reflect pressure history, alignment, worn or bent suspension, damping, bearing play, brake drag, wheel runout, imbalance, rotation history, driving conditions, or tire construction. Correct the initiating condition before it damages the replacement.
Age, history, recalls, and repairability change the decision
The last four digits of the DOT Tire Identification Number identify the week and year of manufacture; the complete code may appear on only one side. NHTSA notes that some vehicle and tire manufacturers recommend replacement from six to ten years regardless of tread. Use the applicable manufacturer policy rather than treating one universal age as law. Storage, heat, ultraviolet exposure, load, pressure history, chemicals, impacts, repairs, and use can matter before an age limit.
Check tires—including the spare—for safety recalls using the complete identification information. A puncture location, size, angle, prior repair, internal damage, tire type, speed rating, and evidence of low-pressure operation determine whether repair is allowed. An exterior plug alone does not permit internal inspection and may not satisfy an approved repair method. Sidewall, shoulder, structural, separation, run-flat, contaminated, or repeatedly repaired conditions often require replacement under tire-maker policy.
Replacement matching must preserve the vehicle’s intended behavior
Select a tire that meets the approved size, load capacity, speed capability, construction, rim fit, and application. Also consider climate, wet and snow needs, braking, handling, noise, comfort, rolling resistance, durability, towing, electric-vehicle load and torque, and the existing set. UTQG treadwear, traction, and temperature grades can help compare eligible passenger tires, but they do not override vehicle fitment or predict exact service life across different use.
Whether to replace one, two, or four tires depends on remaining tread, tire compatibility, axle placement guidance, all-wheel-drive circumference limits, vehicle and tire-maker rules, and the failure cause. Do not casually mix size, construction, tread design, seasonal category, run-flat capability, or materially different wear. If fewer than four are replaced, define placement and any drivetrain limits from authoritative information instead of applying a universal “best tires” slogan.
Rotation manages wear; it cannot repair a mechanical cause
Rotation moves eligible assemblies among positions to distribute work and wear. The correct interval and pattern depend on the owner information, front-, rear-, all- or four-wheel drive, directional arrows, staggered sizes, asymmetric mounting, full-size spare strategy, and wheel or sensor constraints. Some combinations allow only front-to-rear movement; some require tire demounting; others cannot be conventionally rotated.
Before moving anything, record each location, pressure, tread depths, wear pattern, damage, and TPMS identity where applicable. Rotation can expose or relocate an existing noise, pull, conicity, imbalance, or irregular wear pattern; that change is diagnostic evidence, not proof that rotation caused new damage. Afterward set the correct front/rear pressures, torque wheels properly, initialize or relearn systems as required, and road-check. Alignment or suspension work is justified by measurements and condition, not automatically by every rotation.
Balancing addresses mass distribution—not every vibration
A balance machine measures how mass is distributed around a rotating wheel and tire so correction weights can be placed appropriately. Balance new or remounted tires and investigate if a weight is lost or speed-related vibration appears. Correct wheel centering, clean mounting surfaces, suitable cones or adapters, accurate machine setup, tire seating, and secure approved weights affect the result. Excessive required weight can justify checking indexing, runout, tire uniformity, wheel damage, or mounting error.
Vibration can also come from radial or lateral runout, tire force variation, a bent wheel, separated tire, debris, ice, hub or bearing play, axle or driveline faults, brake components, suspension, steering, or engine operation. Steering-wheel, seat, floor, acceleration, braking, and road-speed patterns provide clues but are not final proof. Road-force or runout testing may help where standard balancing passes. Alignment changes wheel angles and vehicle tracking; it does not substitute for mass balance.
Mounting and TPMS service require controlled procedures
Before demounting, inspect and mark the assembly, verify equipment capacity, deflate safely, and identify direct-sensor location and valve design. Incorrect bead-breaking or tool placement can damage a sensor, bead, wheel, or run-flat structure. Clean and inspect bead seats, use approved mounting lubricant, follow tire and wheel match-mount markings where applicable, orient directional or asymmetric tires correctly, and confirm both beads are seated without exceeding published limits.
Direct TPMS service may require a new seal, grommet, washer, nut, valve core, cap, valve stem, or complete sensor according to design. Use compatible materials and specified torque; metal and rubber valve systems are not serviced identically. Clone, program, register, or relearn only through the vehicle-supported method. Preserve sensor IDs before replacement when useful, and do not claim a completed repair merely because an aftermarket tool can activate the sensor on the bench.
Wheel installation and final verification complete the job
Inspect hub and wheel mating surfaces, studs or bolts, seats, threads, corrosion, wheel cracks or distortion, and hardware compatibility. Tighten using the specified sequence and calibrated torque procedure; impact-tool sound is not a torque measurement. Confirm wheel clearance, valve access, spare and security hardware, and any required recheck policy. Incorrect hardware, contaminated seats, spacers, cross-threading, or excessive torque can compromise retention and future service.
Set cold pressure to the correct front and rear values, verify the TPMS display or warning state through its required stationary or drive cycle, and confirm the system recognizes the intended wheel locations when it reports positions. Road-test safely for vibration, pull, noise, steering response, warning lamps, rubbing, and the original complaint over relevant speeds. Reinspect for loss or installation problems, explain any alignment, suspension, bearing, brake, wheel, or tire follow-up, and provide the recorded sizes, pressures, tread measurements, sensor work, balance result, and limitations.