
Cooling-system technical guide
Coolant, radiator, hose, and cap faults must be diagnosed as one operating system
An overheat, low-coolant warning, visible leak, collapsed hose, weak cabin heat, or stained radiator does not identify a failed part by itself. The cooling system depends on correct fluid, sealed pressure and recovery, circulation, temperature control, heat transfer, airflow, sensing, and a complete fill. A defensible repair separates those functions before recommending a flush, radiator, hose, cap, thermostat, pump, or engine work.
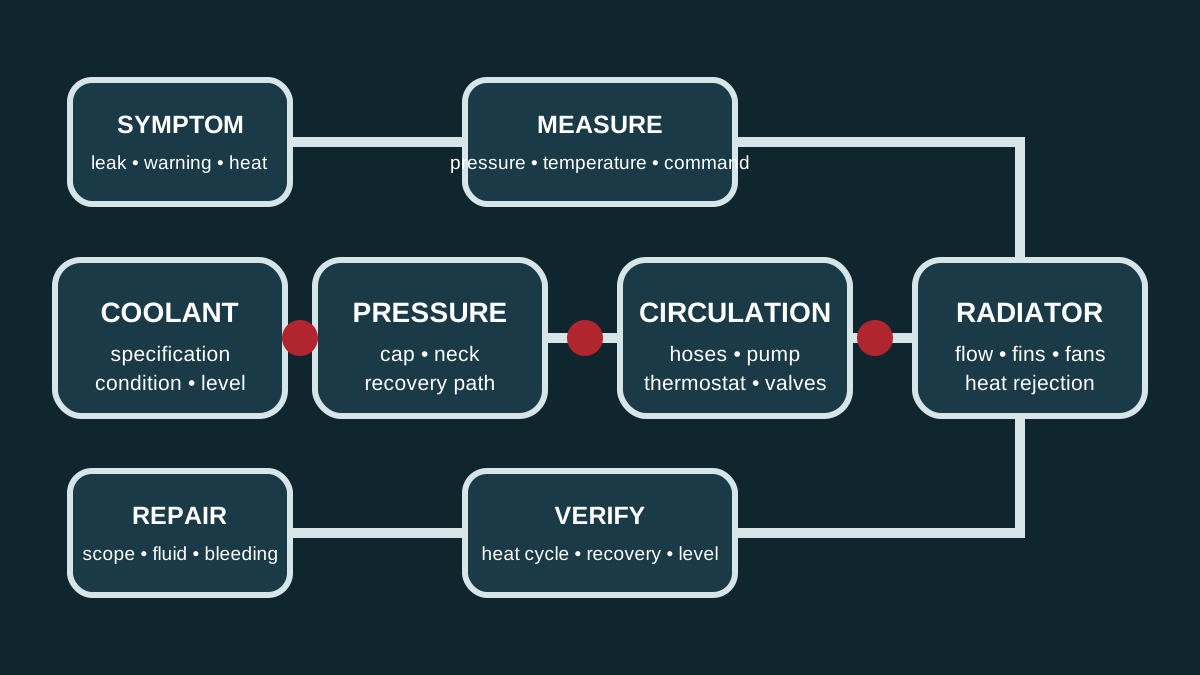
Treat steam, rapid coolant loss, and an active overheat as stop conditions
Pull over safely and shut the vehicle down when the temperature warning remains active, the gauge rises abnormally, steam appears, coolant escapes rapidly, cabin heat suddenly disappears during an overheat, or the engine loses power or runs poorly. Continuing to drive can turn a hose, fan, cap, or small leak problem into cylinder-head, gasket, bearing, catalytic-converter, or complete engine damage. Arrange recovery when the system cannot be evaluated without restarting an overheating engine.
Never remove a radiator, reservoir, or pressure cap from a hot system. Releasing pressure can make superheated coolant boil and discharge steam or liquid violently. Keep clear of electric fans, which may start without the engine running, and do not reach near belts or pulleys during operation. Let the vehicle cool and follow its owner or service information; the absence of visible steam does not prove that pressure is gone.
Record the symptom before disturbing the evidence
Document the warning, gauge behavior, ambient temperature, traffic or road speed, load, air-conditioning use, heater output, fan sound, recent service, collision or road debris, and whether the concern occurs cold, during warm-up, at idle, at highway speed, after shutdown, or on the next cold start. Photograph the first wet point, residue color and location, reservoir level when cold, and any underbody trail before cleaning or adding fluid.
Coolant can run along a hose, engine cover, crossmember, or shield and drip far from its source. A leak may appear only hot, cold, pressurized, under vacuum during cool-down, or while a valve or electric pump changes position. Conversely, condensation water from air conditioning is normal and can be mistaken for coolant. Identify the liquid and reproduce the condition safely instead of replacing the component nearest the puddle.
Use the exact coolant specification—not color—as the decision
NHTSA advises using coolant that meets the manufacturer specification and consulting the owner’s manual. Coolant families can share a color, and products with different chemistry can look similar. Confirm the exact vehicle, engine or battery thermal circuit, required standard, premixed or concentrate form, water requirement, freeze protection, and service information before topping up or replacing fluid. Color alone, a generic “universal” label, or the fluid already present is not proof of compatibility.
The correct concentration provides freeze and boil protection, corrosion control, seal compatibility, pump lubrication, and predictable heat transfer. Too much water can reduce protection; too much concentrate can also impair performance. Unknown mixtures, oil, rust, sediment, stop-leak material, or cross-contamination require a scoped correction plan. Do not assume one drain empties the block, heater, battery loop, auxiliary circuit, or previous chemical residue. Used coolant must be contained and disposed of properly.
Coolant loss is evidence of a leak or unresolved fill condition
A sealed system does not normally consume coolant like fuel. A falling cold level can involve an external leak, pressure-cap or recovery fault, trapped air after service, an incorrectly read reservoir, heater-core leakage, turbo or auxiliary cooling, internal engine leakage, or fluid moving between connected reservoirs. Repeated topping-off hides the rate and can introduce an incompatible product without correcting the cause.
Inspect cold level and condition, reservoir and seams, radiator tanks and core, cap and neck, hose ends and quick connectors, clamps, thermostat and pump areas, heater circuit, drain and bleed points, and evidence beneath shields. Depending on symptoms, pressure testing, cap testing, fluorescent dye approved for the coolant, borescope inspection, cooling-system vacuum behavior, combustion-gas evaluation, cylinder testing, oil inspection, exhaust observations, or extended monitoring may be appropriate. Each test has limits; a negative cold pressure test does not exclude every hot, intermittent, internal, or vacuum-side fault.
The pressure cap and recovery path are functional controls
The cap is not merely a lid. Its application-specific pressure function helps control the system operating envelope, while its vacuum or recovery function may allow coolant to move back from an expansion or overflow reservoir as the system cools. A wrong pressure rating, damaged seal, weak spring, contaminated seat, cracked neck, restricted recovery hose, or leaking bottle can create coolant loss, hose collapse, air entry, premature boiling, or an apparently full bottle beside a low radiator.
Test the cap with equipment and limits appropriate to the design, and inspect every sealing surface rather than judging it by appearance. Some vehicles place the pressure cap on a remote tank and have no serviceable radiator cap. Never substitute a higher-pressure cap to hide overheating or leakage: the rest of the system may not be designed for it. After repair, verify both pressure retention and coolant recovery through a complete heat-and-cool cycle.
Hoses can fail externally, internally, at connections, or as assemblies
Inspect upper and lower radiator hoses, heater hoses, bypass and turbo lines, small bleed and recovery hoses, plastic junctions, quick connectors, clamps, protective sleeves, and molded branches. Look for fresh wetness, crusted residue, cracks near ends, abrasion, swelling, oil-softened rubber, heat damage, bulges, flattened sections, misrouting, loose retainers, and fittings that move or fracture. Gates notes that soft spots and bulges can reveal internal breakdown even when the exterior is not yet leaking.
A lower hose that collapses under load can indicate internal damage, missing support where the design requires one, restriction, or a recovery problem; it does not automatically condemn the radiator. Modular hoses may contain valves, sensors, restrictors, branches, or quick-connect components. Replacement must match shape, material, diameter, routing, connection and integrated functions. Clamp choice and placement matter, and a corroded or distorted neck must be addressed rather than crushed with extra clamp force.
Separate radiator airflow faults from internal flow and heat-transfer faults
A radiator rejects heat only when hot coolant reaches usable passages and sufficient air crosses clean fins. Overheating mainly at idle or in traffic can direct testing toward fan command, fan speed, relays or modules, shutters, shrouds, condenser debris, blocked fins, or airflow recirculation. Trouble under sustained road load can involve heat generation, coolant flow, restriction, combustion leakage, thermostat behavior, pump output, or insufficient radiator capacity, although patterns overlap.
Inspect for impact damage, external debris between stacked heat exchangers, bent or corroded fins, tank or seam leakage, blocked air seals, and fan or shutter operation. Compare inlet, outlet, and surface temperatures only under a defined operating condition and with awareness of thermostat state, fan cycling, ambient conditions, emissivity, and sensor limitations. Cold areas can suggest restricted tubes, but one infrared image does not prove that a radiator must be replaced.
Test pressure, flow, temperature, controls, and engine integrity as one chain
Begin with exact vehicle information, service history, cold fluid checks, a full visual inspection, stored faults and relevant data. Then select tests that answer the observed pattern: system and cap pressure, fan command and current, independent temperature measurement, thermostat response, heater performance, hose temperature relationships, pump command or circulation, recovery operation, or combustion-leak and engine-mechanical checks. Do not use a single code, gauge reading, hose feel, or bubble as universal proof.
Low coolant or trapped air can make a sensor read air rather than liquid and can interrupt heater output or circulation. A thermostat stuck closed, open, or unstable changes warm-up and flow. A slipping mechanical pump impeller, failed electric pump, restricted radiator or heater core, damaged head gasket, incorrect fan direction, or implausible sensor can create overlapping evidence. Compare commands with actual response and actual temperature with reported temperature before naming the failed part.
Drain, exchange, clean, and flush describe different service scopes
A drain and refill replaces only the fluid that exits through the selected points. An exchange changes more fluid using a defined process. Cleaning or flushing may be justified by wrong coolant, corrosion products, oil, sealant, sediment, component failure debris, or a manufacturer procedure, but aggressive chemicals or unapproved equipment can damage seals, leave residue, move debris into narrow passages, or mix circuits. Routine maintenance does not automatically require every cleaning method.
Before authorizing service, define why the fluid is being changed, how much can be removed, whether thermostats, valves, heater or battery circuits affect flow, which product and water quality will be used, how contamination will be handled, and what components cannot be cleaned reliably. If oil or combustion residue entered the system, correct the source first and establish repeat cleaning, inspection, or replacement criteria rather than promising that one flush restores every component.
Filling and bleeding are part of the repair—not a final top-off
Vehicle procedures may require vacuum filling, designated bleed screws, raised fill points, heater or climate settings, scan-tool activation of electric pumps and valves, staged engine speed, or a specific warm-up and cool-down sequence. Some systems contain multiple coolant loops or isolated thermal circuits. A generic instruction to fill the bottle and idle the engine can leave air pockets, unstable level, no heater output, poor pump lubrication, sensor errors, or another overheat.
Record the coolant product, specification, concentration, and installed quantity when useful. Inspect bleed points and disturbed joints, monitor actual temperature and level safely, confirm thermostat and fan behavior, and avoid assuming bubbling always means combustion gas while active bleeding is underway. Hybrids and electric vehicles can retain high voltage with the vehicle off and may use coolant for the battery, inverter, charger, motor, cabin heater, or shared chiller; only trained personnel with the correct isolation and filling procedures should open those systems.
Verification requires the original condition and a complete heat cycle
After repair, pressure-check where specified, inspect every disturbed seal and connection, verify stable operating temperature, fan and shutter response, heater output, coolant circulation evidence, cap and recovery operation, and absence of new faults. Repeat the original idle, traffic, road-speed, load, restart, or cool-down condition when safe. A stationary warm-up alone may not create the heat load or airflow pattern that exposed the complaint.
Let the vehicle cool completely and recheck the level using its procedure because trapped air and recovery behavior can change the cold level. Explain the confirmed fault, tests performed, repair scope, coolant installed, contamination or overheat consequences, and any monitoring or engine-integrity follow-up. Return immediately for renewed warning, steam, falling level, loss of heat, fresh residue, fan abnormality, or unstable temperature; a parts replacement is complete only when the system outcome is demonstrated.