
Engine-intake and cabin-air technical guide
Engine and cabin air filters look similar but protect different systems and require different diagnosis
An engine air filter protects the intake path that supplies combustion; a cabin filter treats air entering the passenger compartment through the heating and air-conditioning case. Dirt, weak acceleration, poor vent airflow, odor, window fogging, dust, noise, or a service reminder can justify inspection, but none proves that a filter alone is the cause. Exact vehicle fitment, maintenance schedule, seal integrity, measured restriction, air-path condition and post-installation airflow define a complete service decision.
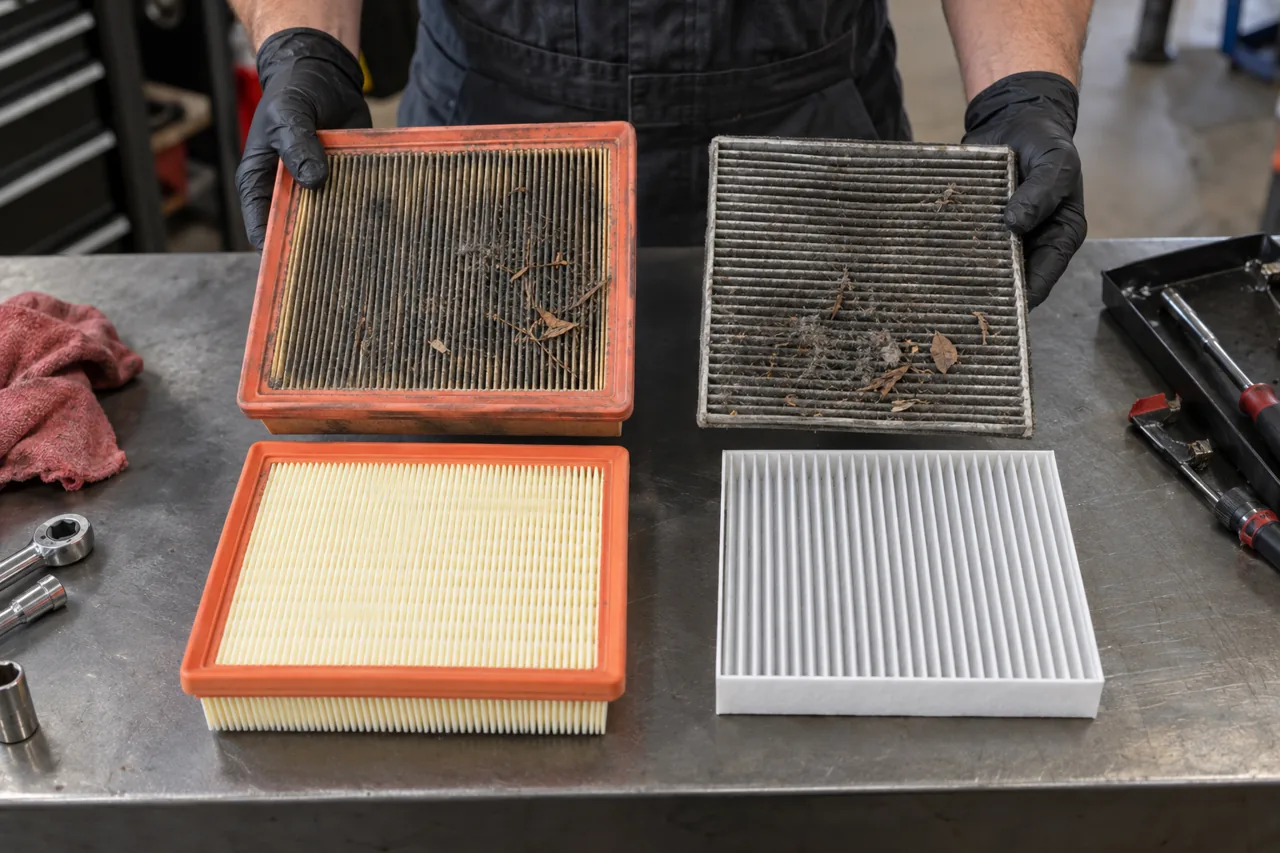
First identify which air path has the complaint
Engine symptoms can include reduced power, unusual intake noise, poor fuel control, smoke, rough operation or an airflow-related warning, but those can involve ducts, sensors, turbo plumbing, throttle, fuel delivery, exhaust, ignition or mechanical condition. Cabin symptoms include weak air from vents, blower noise, persistent fogging, dust, pollen or odor, but those can involve the blower, doors, evaporator, drain, outside-air inlet, recirculation, heater or microbial and moisture sources.
Record when the symptom appears: idle or load, cold start, high engine speed, maximum blower, fresh-air or recirculation mode, heat or A/C selection, rain, wildfire smoke, dusty travel, leaf season, recent body or glass work, rodent evidence or previous filter replacement. A vehicle can have both filters and two unrelated concerns. Diagnose the stated path before selling both parts as one generic “air service.”
Use the exact schedule and operating environment
Consult the owner and maintenance information for time, mileage and severe-condition requirements. Dust, unpaved roads, wildfire ash, heavy pollen, construction debris, frequent leaf exposure, extended idling, urban pollution, humidity and rodent activity can change inspection needs. A calendar recommendation printed by a filter manufacturer is not automatically the vehicle manufacturer’s interval.
Review invoices and inspect only through safe access. A filter can load early in severe use, while another may remain serviceable at a generic mileage. Appearance is part of the evidence, but dark color alone can reflect media type or captured material. Record date, mileage, installed part, environment and actual condition so the next decision uses history rather than a universal upsell interval.
Engine filters protect downstream airflow measurement and combustion hardware
The engine filter sits upstream of the intake tract and is intended to capture particles while allowing the required airflow. The housing, lid, seal, clips or screws, snorkel, ducts, resonators, clamps and downstream connections are part of that protection. A filter that does not seal can pass unfiltered air around the media even if it looks clean, while a collapsed, wet or severely loaded filter can increase restriction.
Bosch lists power loss, increased fuel consumption and emissions as possible consequences of a clogged filter, but those outcomes are not diagnostic proof. Modern engine controls may compensate within limits, and many other faults create the same symptoms. Inspect the entire clean and dirty sides of the housing and use vehicle data or a specified restriction measurement before attributing a drivability problem solely to the element.
Inspect the engine filter without contaminating the clean side
Before opening the housing, remove loose debris around it so dirt does not fall into the intake. Note filter orientation, sealing lip, locating tabs and any airflow markings. Inspect for tears, holes, damaged pleats, oil or fuel, water, snow, insects, nesting material, deformation, loose media, burned areas and dirt tracks past the seal. Examine the housing for cracks, warped lid, missing fasteners and evidence of previous incorrect installation.
Do not strike, wash, oil, vacuum or blow out a disposable filter unless the filter and vehicle maker explicitly approve that procedure. Compressed air can open the media or drive particles through it; washing can damage fibers and leave moisture. Oiled reusable media has its own cleaning and oil-quantity procedure and can create contamination concerns if treated incorrectly. A filter marketed as reusable does not override the engine’s filtration and airflow requirements.
Restriction and airflow data must be interpreted with the full intake system
Where service information provides a restriction indicator or test point, measure under the specified airflow condition. Scan data such as mass airflow, manifold pressure, throttle position, boost, calculated load and fuel correction may support an intake diagnosis, but none has one universal internet threshold. Engine displacement, altitude, temperature, valve timing, EGR and boost strategy change expected values.
A low airflow reading can result from a loaded filter, blocked snorkel, collapsed duct, snow or debris, throttle issue, sensor bias, turbo fault, reduced cylinder filling or exhaust restriction. A lean condition can instead reflect a leak after the airflow sensor. Compare the filter and housing with the complete path, electrical evidence and operating response. Replacing a filter is maintenance; claiming it repaired a warning requires evidence that the warning condition no longer occurs.
Cabin filters influence vent airflow and HVAC cleanliness, not refrigerant charge
A cabin filter is normally located in the outside-air or mixed-air path before the blower or HVAC heat exchangers, though layouts vary. A heavily loaded or incorrectly installed filter can restrict flow, create noise, allow debris bypass or contribute to evaporator contamination. It cannot directly replenish refrigerant, repair a compressor, command a blend door or fix a weak blower motor.
Compare airflow at several blower speeds, modes and fresh/recirculation positions. Weak flow at every mode can involve filter restriction, blower supply or motor, debris, evaporator icing, blocked case or duct. Strong airflow that is not cold points away from simple filter restriction toward refrigerant, heat transfer, compressor control or temperature-door diagnosis. Establish whether the complaint is air quantity, air temperature, distribution, odor or noise.
Cabin media types have different, limited purposes
Standard particulate media captures dust, pollen and other particles within its design. Activated-carbon layers add adsorption capacity for some gases and odors; multilayer products may add finer media or other treatments. Bosch publishes distinct constructions for standard, carbon and multilayer filters. Match the exact part, dimensions, pressure-drop compatibility and vehicle application rather than forcing thicker media into an unsuitable slot.
No cabin filter removes every particle, gas, biological contaminant or odor. EPA’s general filtration guidance emphasizes that filtration supplements source control and ventilation rather than replacing them. Avoid medical guarantees or claims that one automotive filter prevents illness. A carbon layer has finite capacity, and an odor can originate inside the HVAC case, wet carpet, coolant leakage, smoke residue, animals, electrical overheating or an exterior source that requires separate correction.
Odor and fogging require moisture and source diagnosis
Musty odor can involve retained moisture, organic debris at the fresh-air intake, a blocked evaporator drain, wet carpet, water intrusion, microbial growth on HVAC surfaces or a saturated filter. A sweet odor, oily film or coolant loss can indicate heater-core leakage. Burning odor may involve electrical, blower, belt, oil or exhaust concerns. Replacing a filter without addressing the source can allow rapid recurrence.
Persistent window fogging depends on glass condition, cabin moisture, outside conditions, recirculation, A/C dehumidification, heater performance, door operation and airflow. Inspect drains, intake screens, case condition and signs of leakage. Use only vehicle-approved cleaning products and procedures; spraying unapproved chemicals into the inlet can damage coatings, electronics or occupants and does not prove the evaporator or duct is clean.
Access work can affect trim, wiring, doors, and restraint components
Cabin-filter access may involve the glovebox, cowl, trim panels, footwell, console or under-hood covers. Identify clips, dampers, stops, lamps, wiring, temperature sensors and nearby supplemental-restraint components before disassembly. Do not pry blindly or switch the ignition on with required restraint or body connectors disconnected. Follow exact procedures for any battery or airbag precaution.
Clean the surrounding area before opening the housing and remove leaves or debris without dropping them into the blower. Confirm the old filter count and orientation; some vehicles use two linked elements. Inspect the cover seal, latches, drain and evidence of rodent damage. Rodent nesting or droppings require appropriate protective and cleaning practices, not dry sweeping or compressed air that disperses contaminated dust.
Fit, seal, and airflow direction matter more than a similar outline
Compare the new and removed filters for exact dimensions, pleat depth, frame stiffness, sealing edges, tabs and approved application. An arrow may identify airflow direction or simply installation orientation such as “up”; those meanings are not interchangeable. Confirm the housing’s actual airflow or label and the product instructions. Do not crush, trim or fold a filter to make a near match fit.
Seat every edge so air cannot bypass, keep pleats clear of doors and fans, close the housing securely, reinstall intake screens and seals, and restore glovebox or trim hardware. For the engine path, verify the lid, clips, clamps, ducts, sensor connectors and breather hoses. A filter trapped outside its groove can create an unmetered-air leak or let dirt pass despite being new.
Replacement does not authorize unrelated cleaning or additives
An engine-filter service does not automatically justify throttle cleaning, mass-airflow cleaning, fuel additives or intake decarbonization. Those operations have separate indications, materials, risks and verification. Touching a delicate airflow sensor or applying an unsuitable chemical can create the fault the service was meant to prevent.
A cabin-filter replacement does not automatically justify refrigerant recharge, evaporator chemicals, ozone generation or broad “sanitizing” claims. Refrigerant work requires leak and charge evidence; odor treatment requires source identification. Explain optional media differences without presenting a premium filter as a cure for allergies, smoke exposure, mold or a mechanical HVAC fault. Keep the work order specific to what was observed and authorized.
Verify each path under the condition that produced the complaint
After engine-filter work, confirm the housing and duct are sealed, connectors and hoses are secure, no debris entered the clean side, and the engine starts and responds normally. Repeat relevant load and scan-data checks if the filter was part of a drivability diagnosis. A new element plus an uncleared or returning airflow code means the diagnostic work is not complete.
After cabin-filter work, operate each blower speed, selected vent modes, fresh and recirculation positions, heat and A/C functions that are safe and relevant. Confirm expected airflow, no filter or blower contact noise, correct door movement, normal cover fit and improved condition only to the extent observed. Document filter type, date, mileage, contamination, source corrections, access limitations and any remaining blower, drain, odor, leakage or refrigerant concern.